Health & Fitness
Creating a Coordinating Photo Frame
Apersonalized photo frame that makes a great Mother's Day gift or coordinates with your home decor, a favorite photo, your wedding colors or anything you can imagine.
This week I purchased a new pack of colorful designer printed paper that caught my eye. I wasn't sure how I was going to use it on my projects (card making, scrapbooking, something else perhaps?) but I loved the bright cheery colors and I 'needed' the paper. Does that ever happen to you?
I sat down at my crafting desk to see what I could make and near my desk I saw several frames that I picked up at a craft store years ago, (honestly, they were waiting to go in the donation box). As soon as I saw them I knew I had to alter the frame.
Here's how I did it:
Find out what's happening in Viennawith free, real-time updates from Patch.
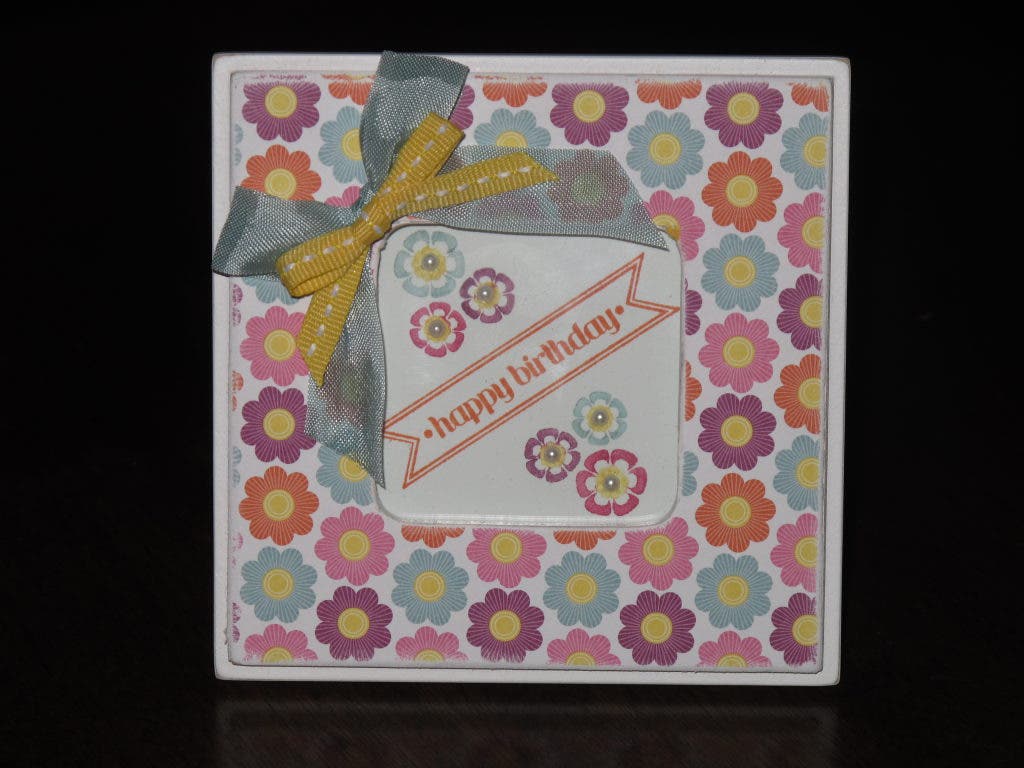
- I cut a square of the Designer Series Paper to fit around the frame and cut a center hole.
- I then attached the DSP to the frame with sticky strip and sanded the edges of the paper to give it a worn look and I set that aside.
- For the insert I inked the Happy Birthday sentiment stamp from Stampin' Up's new Itty Bitty Banners stamp set in Tangerine Tango and stamped it on whisper white cardstock.
- Next I used my Stampin' Write Markers to ink up the triple flower stamp from the Betsy's Blossoms stamp set.
- I added some basic pearls in the center of the flowers and that completed the frame insert.
- I wanted to give a little dimension to the front of the frame so I made a bow with the baja breeze seam binding and made a second bow with the brand new 1/4 inch stitched grosgrain in daffodil delight.
- I attached them both to the top left corner of the frame using glue dots.
When I give this away, my friend can keep the Happy Birthday sentiment in the frame or swap it out for a fun photo of her choice. Such an easy, thoughtful, personalized gift. And the best part about this is you can copy this technique with pretty much any wood frame and the designer series paper of your choice, so you can coordinate with room decor or with the photo that you want to put in the frame.
If you have any questions about this project you can email me at StampingWithRose-Ellen@cox.net . For more information on this project or others, visit my blog at www.MyStampingFriends.blogspot.com.
Find out what's happening in Viennawith free, real-time updates from Patch.
If you want to give papercrafting a try come take a class at the Dunn Loring Volunteer Fire and Rescue Department (2148 Gallows Road, Dunn Loring, VA 22027) this weekend May 11th and 12th for our scrapbooking and card making fundraiser. RSVP's are needed to make sure I have enough supplies prepared for everyone. Details can be found here.
Have a great Stampin' day.
Rose-Ellen
For this project I used:
Stampin' Up! Floral District Designer Series Paper, Sanding Block, Stampin' Up! Whisper White cardstock, Sticky Strip, Stampin' Up! Itty Bitty Banners stamp set, Stampin' Up! Betsy's Blossoms stamp set, Stampin' Up! Assorted Stampin' Up! markers, Stampin' Up! Basic Pearls, Stampin' Up! Baja Breeze Seam Binding, Stampin' Up! 1/4 inch stitched grosgrain Daffodil Delight ribbon. The colors in the Floral District Designer Series Paper pack are: Baja Breeze, Daffodil Delight, Lucky Limeade, Rich Razzzleberry, Rose Red, Tangering Tango and Whisper White.